夜视仪效果 在玩射击类游戏的时候,有时候玩家可以开启夜视仪的功能,这里总结一下这种夜视效果的实现方法,同理,刺客信条里的鹰眼效果,也是类似的做法,使用屏幕后处理的方法去做即可。对于夜视仪的效果:
要实现的就是三个东西:整体的色调改变、闪烁的黑色噪点、屏幕扭曲(畸变)。
在顶点着色器里,要先将剪裁空间顶点坐标转变为屏幕空间坐标:
1 o.screenPos = ComputeScreenPos(o.vertex);
镜头畸变 去百度就可以搜到好几种常用的镜头畸变方法,这里使用桶形畸变的方法,直接使用别人总结出来的数学公式即可,就是先把纹理坐标的原点从左下角移到中心,将纹理坐标基于距离进行扭曲之后再移回左下角:
1
2
3
4
5
fixed2 center = i.uv - 0.5 ; half radius = pow (center.x, 2 ) + (center.y, 2 ); half distortion = 1 + sqrt (radius) * radius * _Distortion; half2 uvScreen = center * distortion * _Scale + 0.5 ; fixed4 screen = tex2D(_MainTex, uvScreen);
画面亮度饱和度颜色 1 2 3 4 5 6 7 8 9 screen *= _Brightness; fixed4 luminance = Luminance(screen.rgb); screen = lerp(luminance, screen, _Saturation); fixed4 grey = fixed4(0.5 ,0.5 ,0.5 ,1 ); screen = lerp(grey, screen, _Contrast); screen *= _VisionColor;
闪烁的黑色噪点 使用一个噪点图,然后对它进行采样:
1 2 3 4 5 6 7 float2 uvNoise = i.uv * _NoiseAmount; uvNoise.x -= sin (_RandomValue); uvNoise.y += sin (_RandomValue + 1 ); fixed noise = tex2D(_NoiseMap, uvNoise).r; screen *= noise;
对于这个噪点图我们不一定需要美术去帮我们做,也可以自己生成,我们也能自己去控制噪点的大小以及密集程度。首先使用柏林噪声去生成一个噪点图:
1 2 3 4 5 6 7 8 9 10 11 12 float [,] noiseMap = new float [mapWidth, mapHeight];for (int x = 0 ; x < mapWidth; x++){ for (int y = 0 ; y < mapHeight; y++) { float sampleX = x / noiseScale; float sampleY = y / noiseScale; float perlinValue = Mathf.PerlinNoise(sampleX, sampleY); noiseMap[x, y] = perlinValue; } }
然后根据这里的值(范围是0~1),去生成ColorMap,对于每一个点的像素,我们都用一个从黑色到白色的lerp,lerp的值就是刚刚存的噪点值:
1 2 3 4 5 6 7 8 9 Color[] colorMap = new Color[mapWidth * mapHeight]; for (int x = 0 ; x < mapWidth; x++){ for (int y = 0 ; y < mapHeight; y++) { colorMap[y * mapWidth + x] = Color.Lerp(Color.black, Color.white, noiseMap[x, y]); } } return colorMap;
最后就是生成一个噪点图texture,然后在着色器里面把它拿去采样:
1 2 3 4 5 6 7 8 9 10 11 12 13 14 15 16 17 18 19 20 21 private Texture2D generatedTexture;public void GenerateTexture ( Color[] colorMap = new Color[textureHeight * textureWidth]; colorMap = GenerateNoiseTexture(textureWidth, textureHeight, noiseScale); generatedTexture = new Texture2D(textureWidth, textureHeight); generatedTexture.filterMode = FilterMode.Bilinear; generatedTexture.wrapMode = TextureWrapMode.Repeat; generatedTexture.SetPixels(colorMap); generatedTexture.Apply(); } private void Start ( textureWidth = Screen.width; textureHeight = Screen.height; GenerateTexture(); }
对于Texture2D.SetPixels方法,Unity对它的描述是:
“This function takes a color array and changes the pixel colors of the whole mip level of the texture. Call Apply to actually upload the changed pixels to the graphics card”
它接收的是一个一维数组,返回的数组放在2D的数组中,像素被从左到右,从上到下的方式排列。数组的大小是这个mip等级的宽乘以高。这也对应了我们之前设置ColorMap的方式。
暗角效果 很多情况下为了给人是从夜视仪的视角去看,还可以做一个暗角效果,就是让屏幕的四个角边缘渐变成黑色:
1
2
3
half circle = distance (i.screenPos.xy, fixed2(0.5 , 0.5 )); fixed vignette = 1 - saturate(pow (circle, _VignetteFalloff)); screen *= pow (vignette, _VignetteIntensity);
首先求得每一个像素到屏幕中心的距离,这个数值越往外面越大,可以使用VignetteFalloff去控制从黑到白的渐变范围,然后要把数值限制在0~1内,因为中心是0,所以要把数值反转一下,最后再对这个暗角值做乘方,就可以控制它的漆黑程度。
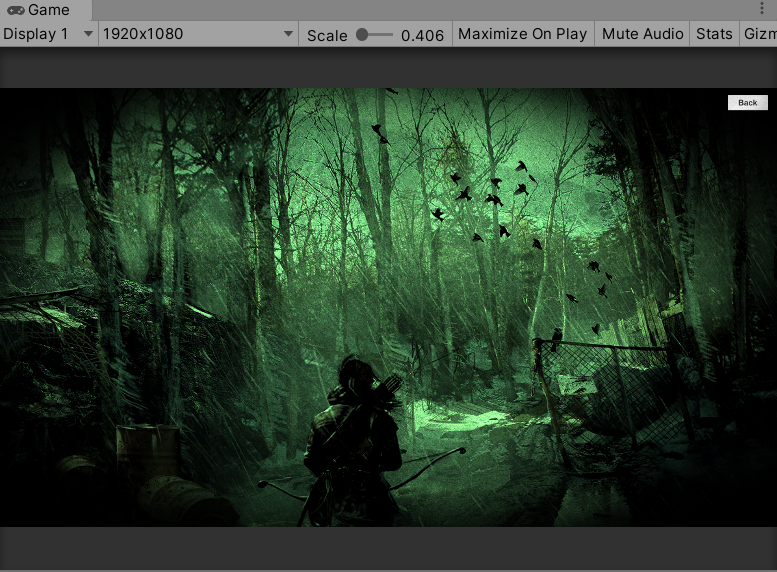
最后效果:
哎感觉hexo在文章里放视频好麻烦,这样有点看不出黑色噪点闪烁的效果。。。