Unity雪地轨迹实现
暑假看了黑神话悟空新发的演示视频,感觉它的雪地做得和大表哥的真的有得一拼了,最近查了查资料,做了一个没有添加粒子的雪地交互轨迹效果,大部分雪地交互轨迹制作应该也是这种方法,不过他们应该在碰撞体和雪接触时按照某种算法去设置了雪粒子飞溅的效果。
对于轨迹的实现,主要是用RenderTexture去做,我们首先创建一个texture,它用来记录轨迹,挂有碰撞体的物体与雪面发生碰撞时,我们在这个texture上的对应位置画上一个颜色,然后在雪地的细分着色器里对这个texture采样,有颜色的就是轨迹,然后用这个数值对地形的高度进行变化,就可以得到类似雪被压过的效果。
C#部分
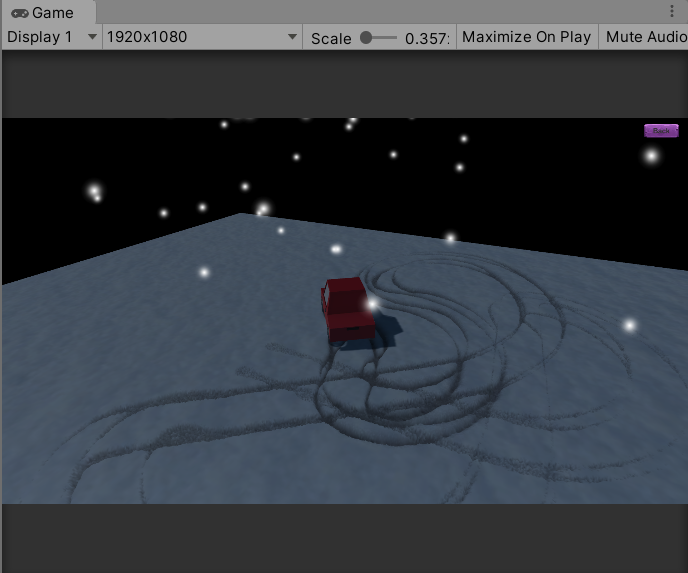
为了测试我使用了一个小车模型,所以要找到车的四个轮子,然后与雪地做碰撞的计算。
1
2
3
4
5
6
7
8
9
10
11
12
13
| public Shader drawShader;
public GameObject snowTerrain;
public Transform[] wheels;
private Material drawMaterial;
private Material snowMaterial;
private RenderTexture splatMap;
RaycastHit groundHit;
private int layerMask;
snowMaterial = snowTerrain.GetComponent<MeshRenderer>().material;
snowMaterial.SetTexture("_Splat", splatMap = new RenderTexture (1024,1024,0,RenderTextureFormat.ARGBFloat));
|
首先是用来在texture上画轨迹的Shader,也就是一个Unlit Shader,为了得到碰撞的坐标,使用射线的方法去实现。
1
2
3
4
5
6
7
8
9
10
11
12
13
14
15
16
17
| for(int i=0; i < wheels.Length; i++){
if(Physics.Raycast(wheels[i].position, -Vector3.up, out groundHit, 1f, layerMask)){
if(lastWheelPos[i] == wheels[i].position) return;
drawMaterial.SetVector("_Coordinate",new Vector4(groundHit.textureCoord.x,groundHit.textureCoord.y,0,0));
RenderTexture temp = RenderTexture.GetTemporary(splatMap.width,splatMap.height,0,RenderTextureFormat.ARGBFloat);
drawMaterial.SetFloat("_TrackWidth", wheels[i].GetComponent<MeshRenderer>().bounds.size.z);
drawMaterial.SetFloat("_TrackWeight", trackWeight);
Graphics.Blit(splatMap,temp);
Graphics.Blit(temp,splatMap,drawMaterial);
RenderTexture.ReleaseTemporary(temp);
lastWheelPos[i] = wheels[i].position;
}
}
|
简单来说就是遍历每一个轮子,然后从轮子往下打一根射线,碰到了地面,就把这里的坐标传给着色器,有个小trick就是我临时创建了一个rendertexture temp,然后把轨迹图放到temp里面,紧接着把这个temp传回原来的texture的时候用画轨迹的shader去处理它。
画好之后再把这个texture给雪地shader的轨迹图:
1
| snowMaterial.SetTexture("_Splat", splatMap = new RenderTexture(1024,1024,0,RenderTextureFormat.ARGBFloat));
|
Shader部分
我们需要的是两个Shader,一个是Standard Surface Shader用来做雪地的曲面细分,另外一个是一个Unlit shader,它是用来在一个RenderTexture上画出物体走过的轨迹。
Unlit Shader
我们只需要对frag函数进行改动,首先对原本的texture进行采样,然后我们接收传进来的发生碰撞的碰撞点坐标,与此时某个像素点的坐标做距离运算,这个值小说明这个点越靠近轨迹,为了把这个值作为一个参数,我们先把它反转,然后把它限制在0~1之间,再对他进行乘方运算,这样就可以控制轨迹的宽度越靠近轨迹,它的乘方就会越接近1。然后与我们设置的颜色相乘,接近1的地方就会被画上轨迹颜色:
1
2
3
4
5
6
7
8
9
| fixed4 frag (v2f i) : SV_Target
{
fixed4 col = tex2D(_MainTex, i.uv);
float draw = pow(saturate(1 - distance(i.uv, _Coordinate.xy)), 500 / _TrackWidth);
fixed4 drawcol = _Color * (draw * _TrackWeight);
return saturate(col + drawcol);
}
|
Surface shader
这里就是具体去实现地形的效果,我们只需要对轨迹图进行采样,然后把采样的值乘以个控制系数,然后去改变地形的y值就可以了,轨迹部分的地形就会凹陷下去。这个采样的数值也要拿来作为地面纹理和雪纹理插值的系数。
Surface Shader的编译指令:
1
2
3
4
5
6
7
8
9
10
11
12
13
14
15
16
17
18
19
20
| #pragma surface surf Standard fullforwardshadows vertex:disp tessellate:tessDistance
void disp (inout appdata v)
{
float d = tex2Dlod(_Splat, float4(v.texcoord.xy,0,0)).r * _Displacement;
v.vertex.xyz -= v.normal * d;
v.vertex.xyz += v.normal * _Displacement;
}
void surf (Input IN, inout SurfaceOutputStandard o)
{
half amount = tex2Dlod(_Splat, float4(IN.uv_Splat,0,0)).r;
fixed4 c = lerp(tex2D(_SnowTex,IN.uv_SnowTex) * _SnowColor,tex2D(_GroundTex,IN.uv_GroundTex)*_GroundColor,amount);
o.Albedo = c.rgb;
o.Metallic = _Metallic;
o.Smoothness = _Glossiness;
o.Alpha = c.a;
}
|
大概效果: