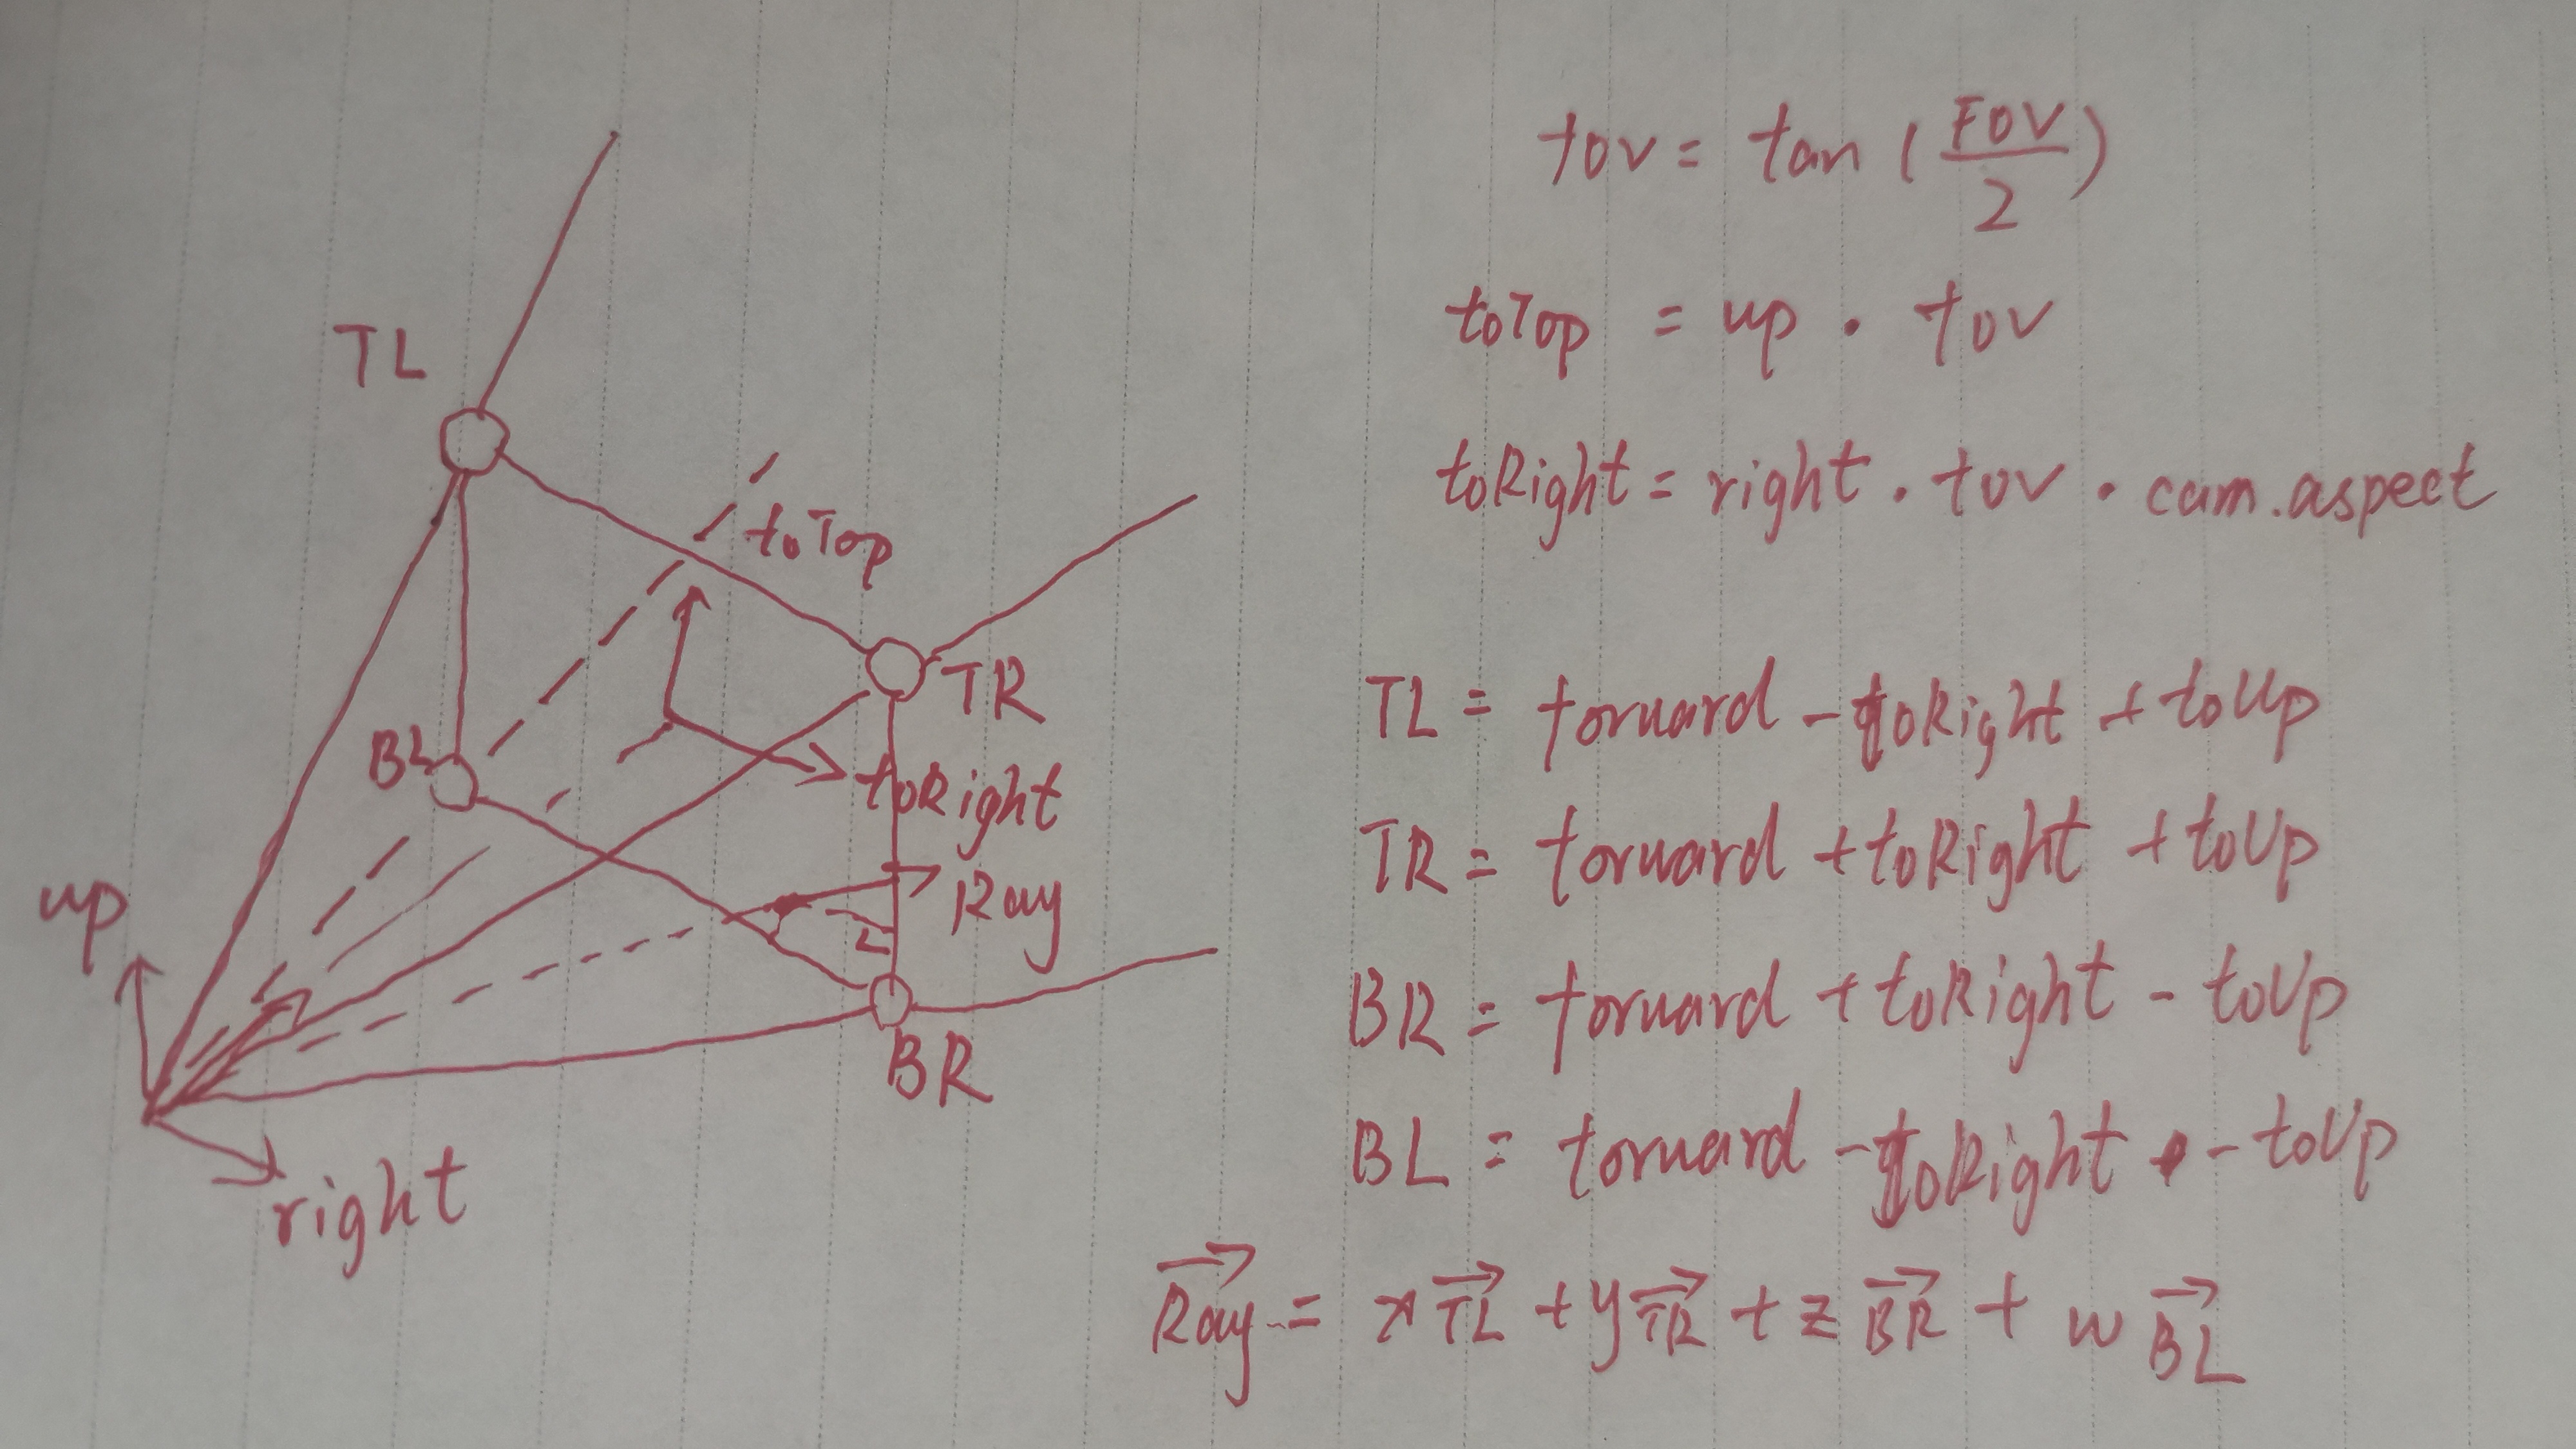
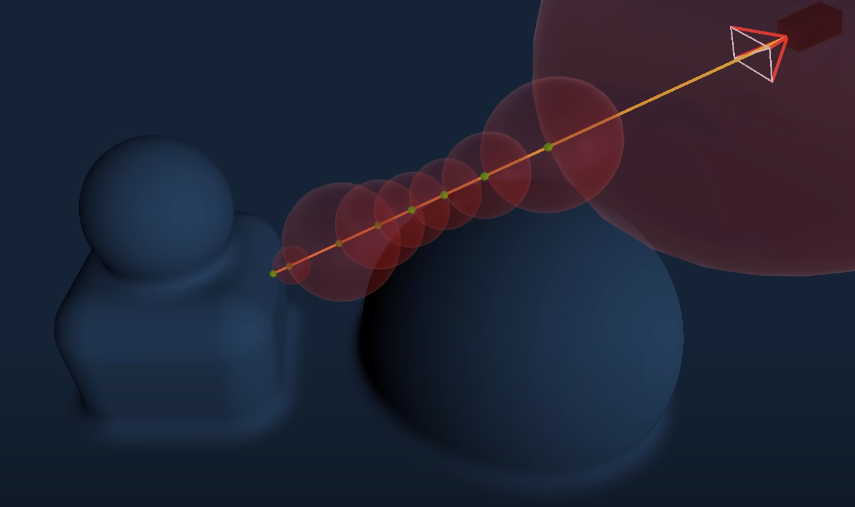
Ray Marching 思想就是光线前进,从摄像机到屏幕的一个像素发射一条射线,它以一定的步长前进,直到与物体发生相交,然后就计算这个像素的颜色。为了得到从摄像机到屏幕上像素的所有射线,要用到Camera Frustum。我们需要计算出视锥体四条棱对应的四个方向向量,raymarching实际做的也是后处理,把图像渲染到指定的Quad上,它的四个顶点就对应了我们求出来的四条视锥体向量,射线的方向就是摄像机到这个平面上某一点的向量,它是这四个向量的线性组合。
求这个Camera Frustum的过程比较简单,求出来之后把它存在一个矩阵里面:
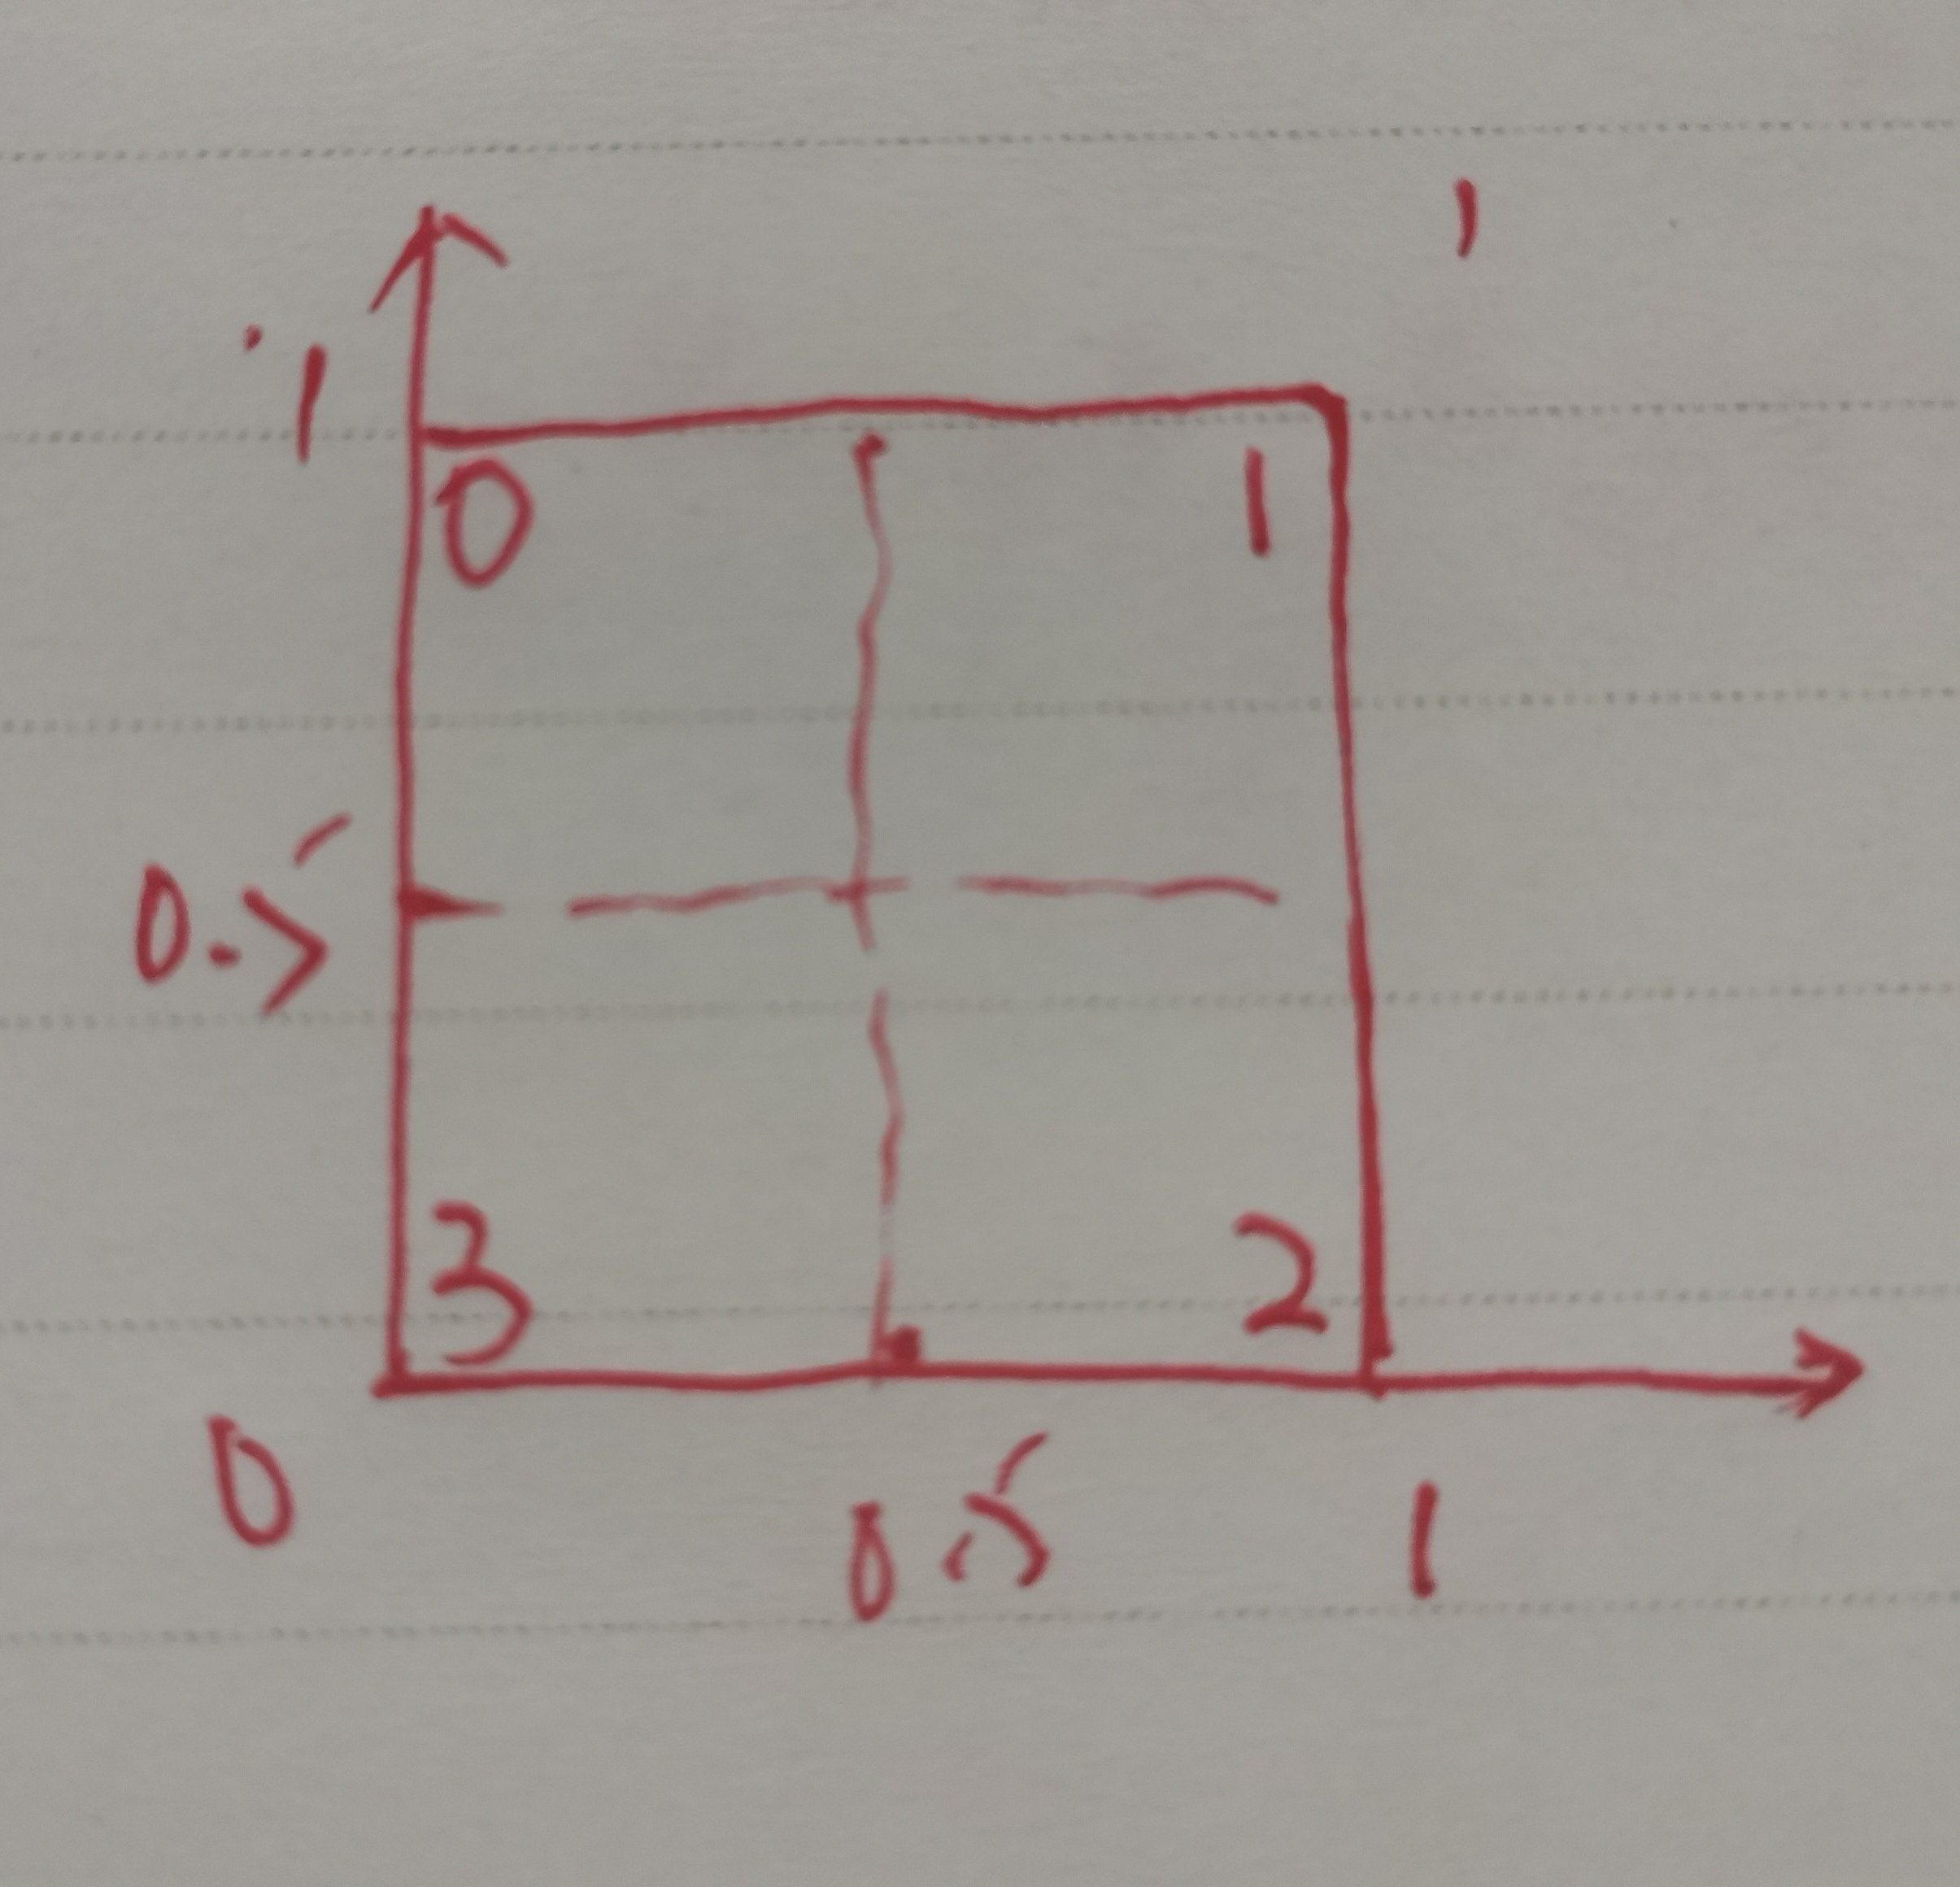
1
2
3
4
5
6
7
8
9
10
11
12
13
14
15
16
17
18
19
20
private Matrix4x4 CamFrustum (Camera cam ) Matrix4x4 frustum = Matrix4x4.identity; float halfHeight = Mathf.Tan((cam.fieldOfView * 0.5f ) * Mathf.Deg2Rad); Vector3 goUp = Vector3.up * halfHeight; Vector3 goRight = Vector3.right * halfHeight * cam.aspect; Vector3 TL = (-Vector3.forward - goRight + goUp); Vector3 TR = (-Vector3.forward + goRight + goUp); Vector3 BR = (-Vector3.forward + goRight - goUp); Vector3 BL = (-Vector3.forward - goRight - goUp); frustum.SetRow(0 , TL); frustum.SetRow(1 , TR); frustum.SetRow(2 , BR); frustum.SetRow(3 , BL); return frustum; }
我们根据像素的位置选择对应的向量,经过插值后传给片元着色器就能得到射线的方向:
物体表面的定义则是通过Signed Distance Functions实现,它可以告诉光线走到某一点时离它最近的表面的距离。
比如对一个球面的定义:
1
2
3
4
float sdSphere (float3 p, float s ) return length(p) - s; }
输入此时光线前进到的位置p,以及球的半径,当返回0时,就说明光线刚好与这个球面相交,所以我们可以认为当返回的值小于一个特别小的值的时候,就打到了这个球,所以这时就去做shading,就可以画出我们想象的然而并不存在的球。
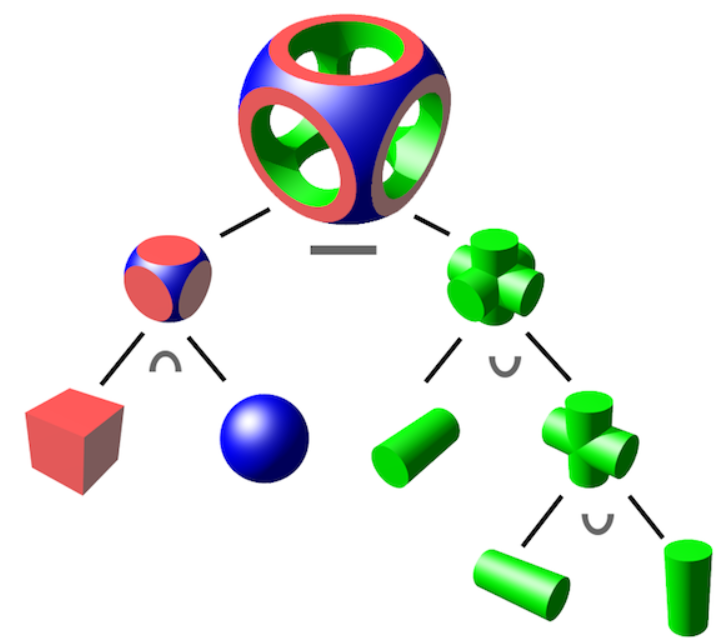
对于两个或者多个物体,我们还可以把他们合并,或者取共同部分,比如:
1 2 3 4 5 6 7 8 9 10 11 12 13 14 15 16 17 float opU (float d1, float d2 return min(d1, d2); } float opS (float d1, float d2 return max(-d1, d2); } float opI (float d1, float d2 return max(d1, d2); }
着色 为了让物体之间有正常的遮挡关系,我们要获取深度值,深度值直接与光线方向相乘就能得到深度。
1
2
3
4
5
6
7
8
float depth = LinearEyeDepth(tex2D(_CameraDepthTexture, i.uv).r);depth *= length (i.ray); fixed3 col = tex2D(_MainTex, i.uv); float3 rayDir = normalize (i.ray.xyz); float3 rayOrigin = _WorldSpaceCameraPos; fixed4 result = RayMarching(rayOrigin, rayDir, depth);
Raymarching部分是重中之重,我们首先需要定义的是射线最远能到达的位置,也就是射线能够循环前进的次数。一根射线的定义是:
每一次都用SDF去求最近的距离,如果最近的距离小于我们设定的最小值,那就去做着色,如果大于,那就让射线继续向前移动
1
2
3
4
5
6
7
8
9
10
11
12
13
14
15
16
17
18
19
20
21
22
23
24
25
26
27
28
29
30
fixed4 RayMarching(float3 ro, float3 rd, float depth) { fixed4 result = fixed4(1 ,1 ,1 ,1 ); const int maxIteration = _MaxIterations; float t = 0 ; for (int i = 0 ; i < maxIteration; i++) { if (t > _maxDst || t >= depth) { result = fixed4(0 ,0 ,0 ,0 ); break ; } float3 p = ro + rd * t; float d = DstField(p); if (d < _Accuracy) { float3 n = GetNormal(p); float3 s = Shading(p, n); result = fixed4(s,1 ); break ; } t += d; } return result; }
用梯度的方法去近似求一个点的法向量:
1
2
3
4
5
6
7
8
9
10
float3 GetNormal (float3 p ) const float offset = 0.0001 ; float3 normal = float3( DstField(float3(p.x + offset, p.y, p.z)) - DstField(float3(p.x - offset, p.y, p.z)), DstField(float3(p.x, p.y + offset, p.z)) - DstField(float3(p.x, p.y - offset, p.z)), DstField(float3(p.x, p.y, p.z + offset)) - DstField(float3(p.x, p.y, p.z - offset))); return normalize(normal); }
Shading 在shading里面我们需要去做光照、阴影、环境光遮蔽的计算。
阴影 射线假如打到了一个点,那么以这个点为原点向灯的方向进步,如果又打到了另外一个物体,那么这个点就是阴影。我们可以用一个最远和最近距离去决定这个阴影射线的长度,为了避免生成硬阴影,需要用一个参数去衡量一个点到阴影范围的远近,并且这个参数的值在阴影部分一定要为0,或者接近0。所以我们用 h / t这个参数,t是射线已经前进了的距离,h是通过SDF求得的距离,当它很小时,说明阴影射线打到了一个物体,这个 h / t 也就趋近0,那么它黑色的程度就应该越大。
对于每一根射线,我们都在一个for循环里找到这个参数的最小值,它衡量了这个点的阴影程度:
1
2
3
4
5
6
7
8
9
10
11
12
13
14
15
float SoftShadow(float3 ro, float3 rd, float mint, float maxt, float k){ float result = 1.0 ; for (float t = mint; t < maxt; ) { float h = DstField(ro + rd * t); if (h < 0.001 ) { return 0.0 ; } result = min (result, k * h / t); t += h; } return result; }
AO 环境光遮蔽 AO主要用来描绘物体和物体相交或靠近的时候遮挡周围漫反射光线的效果,开了AO画面会变得暗一些,特别是一些物体凹进去或者相交的地方,会让投射出的阴影看起来更真实。这个的实现就是用法线进步去判断附近是否有物体,附近的物体离得越近,他就越“黑”。
1
2
3
4
5
6
7
8
9
10
11
12
13
float AmbientOcclusion(float3 p, float3 n){ float step = _AoStepSize; float ao = 0.0 ; float dist; for (int i=1 ; i <= _AoIterations; i++ ) { dist = step * i; ao += max (0.0 , (dist - DstField(p + n * dist)) / dist); } return (1.0 - ao * _AoIntensity); }
最终的shading就是把上面的到参数和颜色相乘:
1
2
3
4
5
6
7
8
9
10
11
12
13
14
15
16
float3 Shading(float3 p, float3 n) { float3 result; float3 color = _MainColor.rgb; float3 light = (_LightCol * dot (-_LightDir, n) * 0.5 + 0.5 ) * _LightIntensity; float shadow = SoftShadow(p, -_LightDir, _ShadowDst.x, _ShadowDst.y, _ShadowSoft) * 0.5 + 0.5 ; shadow = max (0.0 , pow (shadow, _ShadowIntensity)); float ao = AmbientOcclusion(p, n); result = color * light * shadow * ao; return result; }
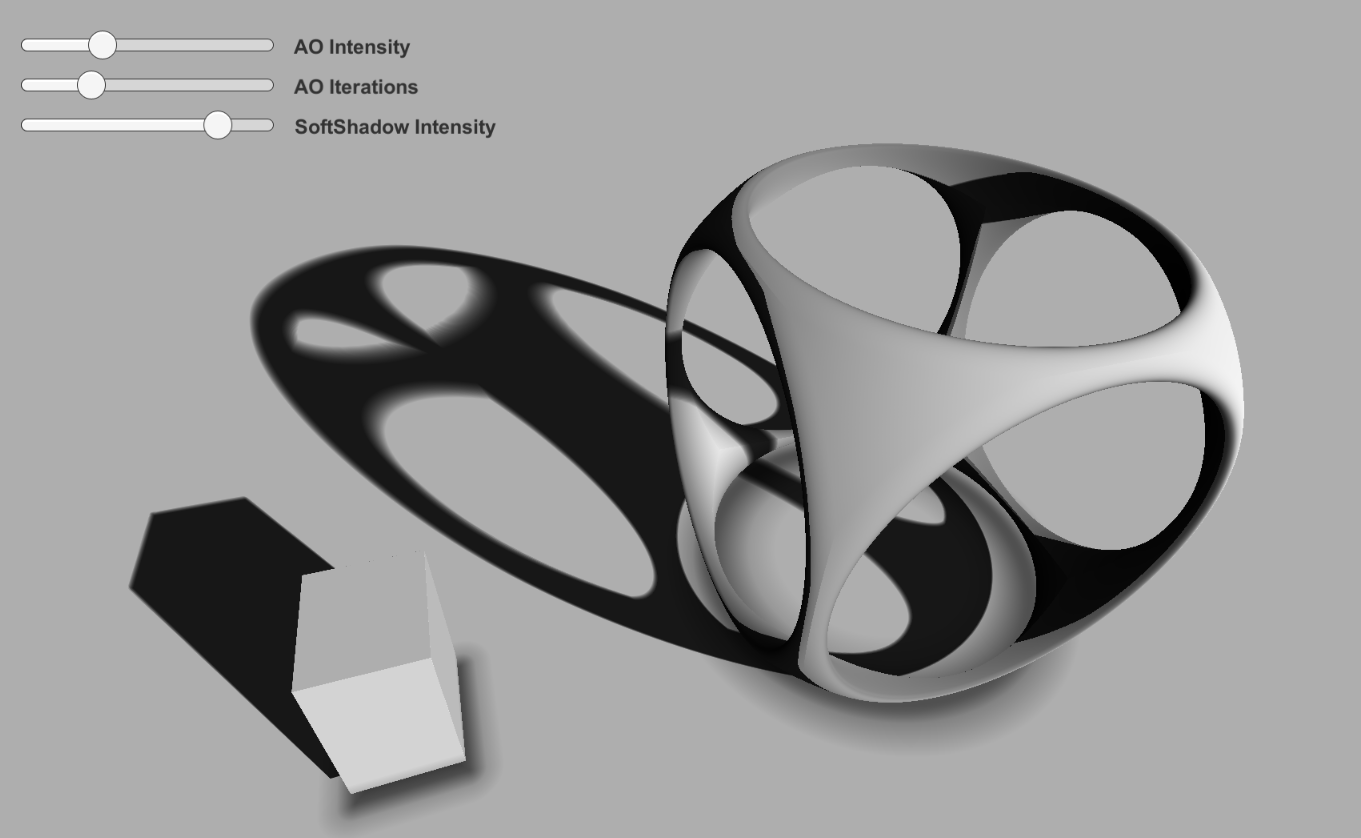
最后用实现的效果:
附:
https://www.iquilezles.org/www/articles/distfunctions/distfunctions.htm
一个有各种SDF函数和各种组合集合体方式的网站